Behind the scenes: “Good old times”
This is a behind the scenes post for the Lego photograph: “Good old times“.
Planning the Lego photo
This time I was looking for a happy emotional scene. And again, I wanted to try something complete new to me. I had seen a lot of toy photographers use photos as a background. Up until now, I never did. I always feared it would look too artificial. Yet, a few months back i did print a few backgrounds… to be put in a drawer unused. One of these backgrounds was a sunset. The sunset struck a cord. It got me thinking of a couple walking into the sunset. For some reason an earlier toy photo of mine entered my mind: “Lonely old man“. That brought me to the decision to use an elderly couple.
Contrast in the title
Some of you might know I like some kind of contrast in my photography. I did not see any contrast in this image. Instead, the contrast is a little hidden in the title combined with knowing about the “lonely old man“-photo. Good old times can refer to the good times these two ‘old’ people are experiencing, making this a happy image. Yet, it could also be the lonely old man remembering the good old times…
Setup
As stated I used the sunset picture as a background. Lighting could also be relatively simple this time. One light as far to the front as possible. Because I did not succeed in putting it directly in front, I put it to the side a little as shown in figure 1.
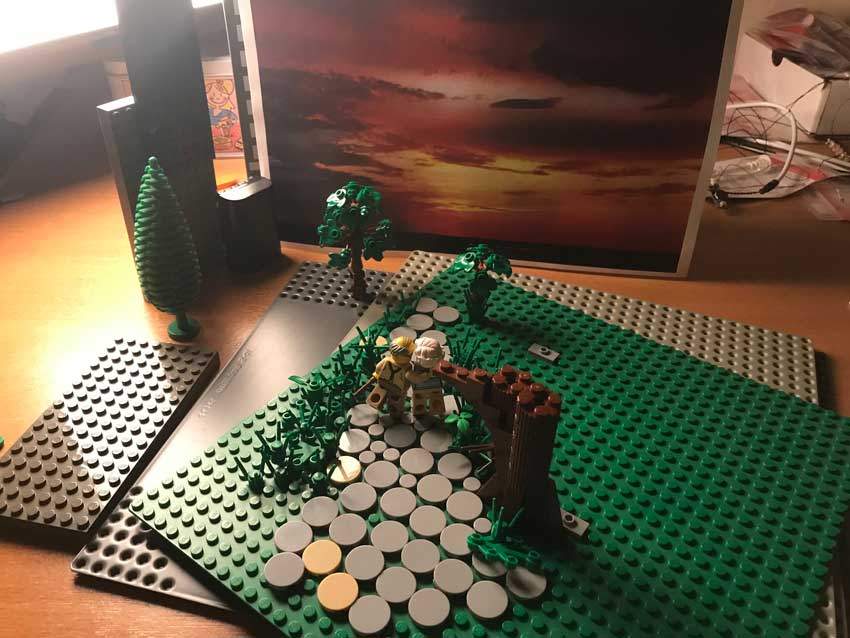
The plates to the side serve two purposes; first and foremost they prevent direct light from entering my lens. Second, they regulate the lights/shadows on the trees and couple a little.
Building the scene
Typically I build the scene before I do the setup. This time I Used the path from the ‘startled guard‘ image and put the couple on there as he center of the image. Next i placed the camera, framed and lighted the scene. Only then I started to build the scene, constantly looking through the cameralens for the effect of everything I added. I did something like this before in the ‘back alley ghost‘ image and again I was surprised at how few Lego bricks were actually needed to fill the scene as you can see in figure 2.
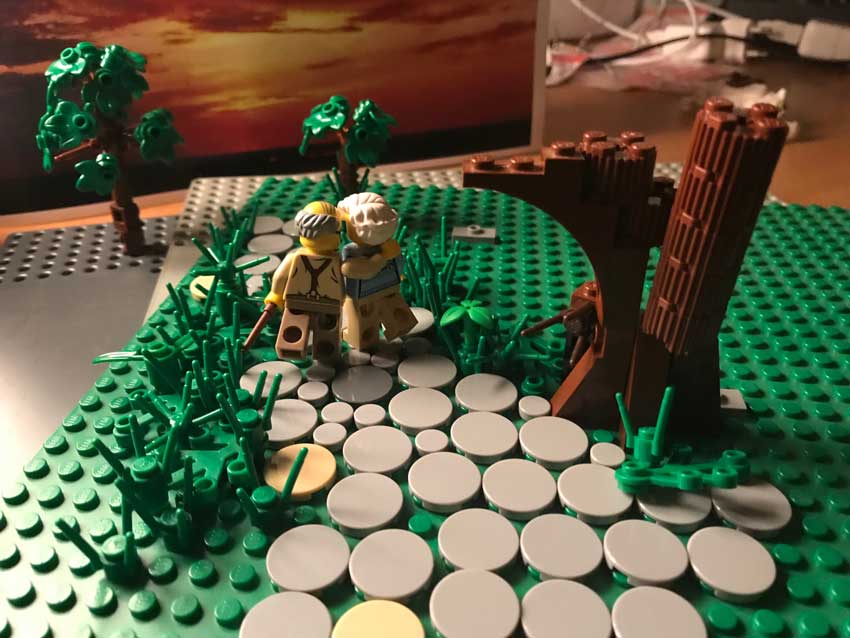
Take a special look at the trees. The small tree in the back right was used for adding a little depth. Because of the contrast with the much higher tree on the left, it looks as if the tree on the right is much further away than the one on the left (forced perspective).
Also take a look at the ugly big tree in front. I could have build a stunning tree, correct and beautiful. However, it would’ve never shown in the photo. Because I was a little short on time this tree was build brick by brick, looking through the lens for the effect of every brick. The illusion of a normal giant tree is there (I think).
The shot and post-processing
I took the shot with a f100 mm Pentax macro lens at ISO 100, aperture f/5.6 and shutter speed 1/60. In post-processing i added vignetting and adjusted the levels a little. The resulting image is below.

In the end, I am not completely happy with the effect of the background. It looks… well… like a photo in the background. I’ll have to see how I can refine the technique, so if you have any tips, I’ll be happy to hear them. Have you ever used photographs as background in your photography? How did that work out?
OTHER POSTS THAT MIGHT INTEREST YOU;
You can subscribe to the newsletter to receive occasional updates from Foolish Bricks.
Great btw foolish. This is super useful to me!
Regarding the background – in my comics I light the scene *through* a page on which I drew a sky, which is good for both the lighting and the background. Maybe it would help if you added a flashlight that would shine through the page. Attaching a picture from my comic – file:///C:/Users/ADMIN/Pictures/%D7%A1%D7%A4%D7%A8%20%D7%9C%D7%92%D7%95%20%D7%A4%D7%A1%D7%97/%D7%94%D7%90%D7%95%D7%94%D7%9C%D7%99%D7%9D%20-%20%D7%94%D7%A1%D7%A6%D7%A0%D7%94/_MG_0857.JPG
Hi Ref,
Thanks for the tip!
I abandonded printing backgrounds alltogether and now have a setup with a computerscreen in the background. Adjusting the lighting of the background image is way easier now.
You can see my current set-up in the picture underneath this comic-episode (https://foolishbricks.com/comic/lego-comic-snakes-and-honey-3-096/ )
PS. Attaching the photo didn’t work it seems. This link refers to a local photo on your computer.
Sorry! I just recently saw that you addressed my comment. I thought I would get an email about it. If the link didn’t work you can see the picture I was referring to in the attached link to my Facebook page. The page is new and I haven’t had time to fill it out yet, but this picture is already there as a profile picture. I am attaching the link – https://www.facebook.com/profile.php?id=100091305953010&sk=photos
post Scriptum. I signed up for the newsletter but I am not receiving updates. Is this a problem on my end?